
I just thought I would let you know that I have been and will be posting most of my crafty stuff on my craft blog that I am doing with my sister Marissa. The first half of the posts are actually crafty posts from the last year or so that I imported from this blog, so it won't be anything new, but there are several more recent posts. I will probably still occasionally post some of the things here for those who are interested, or post a link to a certain post on the other blog, in case you're like me and already have a bazillion blogs you check and don't have time/ don't remember to check one more.
Anyway, here is the link: Home Sweet Homebodies
Showing posts with label Crafts. Show all posts
Showing posts with label Crafts. Show all posts
Wednesday, January 06, 2010
Wednesday, December 02, 2009
Gift ideas that won't strain your budget
I LOVE these sites- what cool ideas! I think some of these projects would make good stocking stuffers for kids. Many of them look really easy and fast to make. You just need paper, perhaps a few other supplies you probably have lying around the house, and a printer for some of the projects.
Fantastic Toys- freebies
Feed Your Soul- free printable art
Free animal sewing cards
The Toymaker- folding paper toys you can make yourself
Gift bags made from envelopes
Make your own gift bows
Let me know if you try any, and how it goes!
My take on the envelope gift bags:


Fantastic Toys- freebies
Feed Your Soul- free printable art
Free animal sewing cards
The Toymaker- folding paper toys you can make yourself
Gift bags made from envelopes
Make your own gift bows
Let me know if you try any, and how it goes!
My take on the envelope gift bags:


Tuesday, December 01, 2009
Regular jeans to maternity jeans
http://www.instructables.com/id/How_to_Make_Maternity_Jeans_Using_Regular_Jeans_an/
On second thought, I won't post pictures of my jeans now. It's just one of those awkward, I look really chubby- not quite pregnant pictures. Maybe later...
Anyway, thanks Alise for sending me the link to this project!
On second thought, I won't post pictures of my jeans now. It's just one of those awkward, I look really chubby- not quite pregnant pictures. Maybe later...
Anyway, thanks Alise for sending me the link to this project!
Gift Tags
We had a wonderful Thanksgiving last week and I enjoyed the opportunity to reflect on many things I am grateful for. This week I have continued working on different Christmas projects and looking for more gift ideas, and have come across many great resources on some really cool blogs. I thought I would share some of them in a post or two.
Check out these cute gift tags that you can print:
http://www.lindalumdebono.blogspot.com (Top right of the page)
http://nobitingwolfie.blogspot.com/2009/11/tag-youre-it.html
http://www.lollychops.com/ (A favorite of mine)
http://littlepaperdog.blogspot.com/2008/07/big-four-zero.html
http://limegardenias.blogspot.com/2009/11/peppermint-tags-for-you.html
http://aprintaday.blogspot.com/2009/05/downloads-tags-stickers-and-notepad.html
http://cp.c-ij.com/en/contents/3125/list_45_1.html
http://thepaperseed.com/?p=213
http://tipnut.com/wrap-up/
I have printed several of these with great results! I especially like how some of them look printed on brown craft paper, or various colors of cardstock.
Saturday, November 14, 2009
I am so excited for Christmas!!!!
I have been listening to Christmas music all week. And loving it. It has helped me get into the spirit of Christmas as I make highly secret Christmas gifts. :D My family has a tradition of drawing names for Christmas where the giver is to put together a gift for the receiver preferably using their talents or catering to the talents of the receiver. There isn't a rule against spending money per se, but it must be a "gift of the heart". Anyway, I drew Marissa this year, so I have been busy (and having lots of fun) making *something* for her. Planning and working on gifts for others makes the Christmas season so exciting! Marissa and I are also working on a super secret Christmas project together. It is going to be so exciting to give! I can't say what it is or who it is for, but we are really excited about how it is turning out so far! I will definitely be posting pictures after Christmas!
I am a little stumped on what I could make for the men & boys (old and young) in my life. I am not opposed to spending money, but I am really having fun making stuff. The requirements are that it has to be useful and not junky. No trinkets. I have a few ideas, but none that are particularly striking my fancy at the moment. Any suggestions?
I am a little stumped on what I could make for the men & boys (old and young) in my life. I am not opposed to spending money, but I am really having fun making stuff. The requirements are that it has to be useful and not junky. No trinkets. I have a few ideas, but none that are particularly striking my fancy at the moment. Any suggestions?
Thursday, November 05, 2009
Halloween
This Halloween was kind of fun, because we got to dress Gabe up and he kinda liked it! As I was making his costume, I would periodically try it on him to see how it fit and what alterations I needed to make. Gabe really seemed to like wearing it, and he even cried a couple of times when I took the costume off him to keep working on it. I'm not sure how much he understood of what was going on, but he loved looking at himself in the mirror in his costume and saying "fff-fff-fff" (woof woof). He was also pretty fascinated that people would put things in his trick or treat bag. He got to take a couple bites of his first candy bar, which he thought was pretty amazing, judging from the faces and sounds he made while eating it. We took Gabe to our ward's Trunk-or-Treat party and to BJ's office to trick or treat at all the cubicles. It was fun because everyone was dressed up- some pretty elaborately- and Gabe was somewhat bewildered by it. He did get the hang of picking up candy and putting it in his bag. We dressed him up again on Halloween night although we did not take him outside. We had Marissa and Richard over along with some other friends, Max and Rebecca, to carve pumpkins, eat treats, and watch Ghostbusters. Anyway, we thought Gabe was the cutest little puppy ever to trot (ok, so we tend to be a little biased in these things), so here are some pictures.
Friday, October 30, 2009
Craft Day
Marissa and I have been getting together about once a week to do a crafty-homey type thing. This project was the result of Marissa wanting to make something in the "home decor" department. We thought letter blocks were cute, but didn't have any wooden blocks. We ended up downloading a paper folding box template and making our non-cubical cubes out of cardboard. (Not recommended, for time management purposes) Then we covered them in paper- black and white scrapbook paper on one set, and brown craft paper on the other. It's all held together with generous amounts of Mod Podge. I love the contrast of the red letters on the black and white. I used wrapping paper to make the letters on the Christmas block set. We traced around enlarged letters from a font we liked on the computer so the letters would match (I don't consider myself an artist in that department at all). Anyway, despite being fairly time consuming (mostly assembling all the little boxes) we had fun putting this project together.
Thursday, October 29, 2009
Sweater Love
I love sweaters, but I always have a few that aren't "quite right". It's easy to give many sweaters a style makeover to make them more wearable.
I had fun experimenting with turning pull-over sweaters into cardigan-style sweaters.


My sister and I added some interest to a boring, plain sweater just by sewing on some ribbon and a few buttons. Sorry, I forgot to take "before" pictures of the next couple!


Similarly, this sweater wasn't working for Marissa because the sleeves were an awkward length- too long for 3/4 sleeves, too short for long sleeves. So we decided to go short!

I have a few other ideas for sweater refashioning, which I have yet to try. If they work out, maybe I will post more pictures.
Saturday, August 29, 2009
Quilted travel jewelery case
I did a similar case a few months ago for a camera. I used the leftover fabric for this case, making it a little larger, adding a ribbon for easier carrying, and dividing the case so there were two pockets.


This is a quick and fun project. Visit my previous entry on making the case to see some links to a tutorial and some helpful tips.


This is a quick and fun project. Visit my previous entry on making the case to see some links to a tutorial and some helpful tips.
Thursday, August 13, 2009
Man's Shirt to Woman's Shirt Tutorial
Here is my own take on the man's shirt to woman's shirt refashion that has been going around the online sewing/ crafting community lately. There are quite a few different styles out there. Clothing refashioning really appeals to me, especially pattern-less refashioning.
After some hesitation, I decided to share pictures I took along the way with commentary, tutorial- style. I am a little nervous to share; this is the first tutorial I have ever written for something that I made up. If there is anything that is unclear, please let me know and I will try to clarify.
Click on the album below if you would like to be able to see the instructions. They were too long to include in the slideshow here, but you can see them in the album itself. I appreciate any feedback on whether this format is useful for a tutorial, if anyone tries it.
Thursday, July 23, 2009
Baby Hooded Towels
If I have ever come to your baby shower, there is a good chance you received a hooded towel along with other baby goodies from me (Ok, I didn't do this every time, but several times I have). My mom showed me how to make these several years ago, and I've enjoyed making them ever since.
 The above picture shows a hooded towel the way I was taught to make it- using a bath towel and a specially folded washrag. This is great for newborns. If you have a big headed baby (like me) who outgrows their hooded towel, you may want to try a different method, like the one shown next!
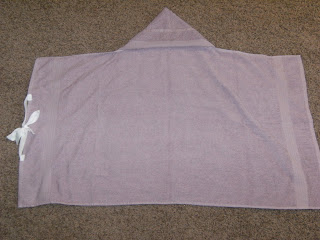 ^This is one of my more recent hooded towels, made with half a hand towel instead of a washrag. You just cut the hand towel in half, fold and sew that raw edge to itself, match the seam you just sewed to the center of the long edge of the bath towel, pin, and sew. You can probably figure it out from the picture. You can see in the picture that I like to fold the decorative edge of the hand towel up before I sew it. This cuff is a nice detail, and also keeps the towel from flopping over baby's eyes. There is plenty of room for baby and toddler heads. There are other methods out there for hooded towels for older kids.
 The ties that you see in some of the pictures is a recent idea I got from Martha Stewart- make the towel into a bath apron for yourself- handy when you don't want to be nearly as wet as the baby by the end of the bath! It also gets the towel into position so you can quickly lift baby out, onto your lap, and cover with the towel to keep as warm and toasty as possible.
 My cute little guy after a bath!

A cute way to package the hooded towel that my mom taught me. Roll the sides of the towel in to the center, fold up, and tie. This creates a nice little pouch you can fill with bath goodies. Draw a face on a disposable diaper if you want, and put under the hood.

Another cute idea for packaging. This is just a washrag folded in half to be a triangle, then tightly rolled from the corner to the folded edge, then the roll is folded twice and tied with a ribbon. I think it is cute as it is to be a bath scrubber (it is washable as is, but you could undo it to wash it to be a little more sanitary, then redo it), but some people add all sorts of decoration, googly eyes etc. and use it as an ice holder for bumps and bruises- a "boo-boo bunny". You can google that if you want to see way more detailed tutorials on how to make.
 My cutie again. I added ric rac as an easy embellishment on the hood.
Saturday, July 11, 2009
Crocheted Dish Rags and Hand Towel

This was a simple if not quick project for me. It is a nice project to work on when you want to have your hands busy while doing something else that requires attention. I only picked up my crocheting while I was doing something else too, like watching movies, riding in the car (as a passenger!), watching my son play etc. Thus it took me quite some time to finish a little project. I used a half double crochet stitch, with a size F crochet hook, and just started with a chain as long as I thought I would like my dish rags. The hand towel I did the same, just twice as long. I added stripes or a border on some of them. The yarn is 100% cotton. The rags match my kitchen and I am excited to use them!
Monday, June 22, 2009
Quick and easy headband
This was a fairly quick project, and what I like about it most is that the headband actually stays on, and you don't have to sew elastic in it or anything- you use a scrunchy. Way cool.


The tutorial for this project can be found at bluebirdstudio.blogspot.com or by clicking here.


The tutorial for this project can be found at bluebirdstudio.blogspot.com or by clicking here.
Tuesday, June 09, 2009
Ugly mousepad no more
Since I love "Before" and "After" pictures so much, here are some for you:
Before:

After:

I have hated this eyesore of a mousepad for the last 5 years (I know, sad, huh? You would think that I would get a new one at some point- but no need now!). I found this cute and super easy craft on one of my favorite craft blogs, Make It and Love It. Click here to see the tutorial.
Friday, May 15, 2009
Quilted Camera Bag

Here is a project I made a while ago. I got the idea for this camera- protecting pouch from this blog: http://ayumills.blogspot.com/2008/04/how-to-make-super-simple-camera-case.html
Since I let my camera pretty much just float around in my purse, I thought this might help protect it a bit. With a few modifications- i.e. velcro instead of a button- I was pleased with the result, although it was my first real experience with bias tape, so parts look a little clumsy. However, I decided I love bias tape! I know some people have a hard time with bias tape, but let me share a little secret with you- a YouTube video I found a couple months ago called the "No swearing bias tape method"- check it out here.
Tuesday, May 12, 2009
Handtowel Bibs


I have always wanted to make one of these- it's a very, quick, satisfying project that is useful! You can probably figure out how it's made by looking at the pictures. I used a $1 handtowel from Target, a fabric remnant, and some bias tape.
I would like to try this again. What I would do differently? 1. Use a more sturdy handtowel. 2. Make the neck hole much, much smaller, so as to not end up with a bib that is too big for Mommy! 3. Make the ties a little longer for ease in tying.
Monday, April 20, 2009
Clothing Reconstruction
Since highschool, I have had a love and fascination with clothing reconstruction. I often tweak little thinks (nothing really drastic) on clothes I buy, to make them fit better or improve the look. So when I saw an idea on the web to make kids pants out of T-shirts, I thought of this old sweater I had in my sewing drawer that BJ didn't want any more. I thought it was just the thing to use. After I made the pants, I saw what remained of the sweater and thought I could easily turn it into a mini-sweater for baby! The neck was a problem- way too big for a small head, so I added the button with an interesting result. Anyway, I realized that this was actually the first thing I have made for Gabe. I think I'll definitely be making more stuff that way.


I love recycling!


I love recycling!


Saturday, April 18, 2009
Life
What's new? Not too much. BJ is really busy with work right now, preparing for some kind of security audit, and I am doing the same old stuff, working a bit at the clinic and taking care of things at home. Gabe just turned 9 months old last week and- get this- cut his 7th tooth. I am completely serious. Where did all these teeth come from?! I was talking with a friend of mine this morning whose daughter has 7 teeth also. But she is a year older than Gabe. Hmmm. I hope he doesn't have teeth crowding problems like I did. Other than being somewhat cranky from teething, Gabe has just been delightful! He is in such a fun interactive stage. He loves to growl, and he has started giving real hugs where he either puts his little chin over your shoulder or lays his cheek on your cheek, and wraps his arms behind your neck and strokes your hair. Precious! He is loving table food, and is quickly tiring of baby food. However, Cheerios will probably be one of his favorite foods for a long time. He is so good with his pincer grasp now, he pops those Cheerios in his mouth with no trouble. He does take a couple of naps per day- sometimes they are each only 30 minutes or so, but sometimes he'll sleep for over an hour. He is very curious and wants to learn and be entertained. He loves to play with (aka yank on) zippers, earrings, necklaces, and watches, so watch out!


Lately, I have been crafting a ton as well. I get a lot of satisfaction out of making things and trying to be creative. I don't know if other moms out there have felt similarly, but sometimes I feel guilty when I spend time on stuff like that (hobby stuff) when there are a zillion other things I think I should be doing (i.e. laundry, picking up toys, dishes, etc.) However my little projects really seem to rejuvenate and relax me and give me a sense of accomplishment, AND I enjoy myself without feeling like I just wasted half my day (I was feeling that way a few months ago when I was searching for something to do and would end up turning on the TV to watch shows I didn't even like much). Then today I read a quote my cousin Cami posted on her blog which really helped me understand why it was ok for me to have personal time and interests. It is from a conference talk by M. Russell Ballard:
"Sisters, find some time for yourself to cultivate your gifts and interests. Pick one or two things that you would like to learn or do that will enrich your life, and make time for them. Water cannot be drawn from an empty well and if you are not setting aside a little time for what replenishes you, you will have less and less to give to others, even to your children. Avoid any kind of substance abuse, mistakenly thinking that it will help you accomplish more. And don't allow yourself to be caught up in the time-wasting, mind-numbing things like television soap operas or surfing the Internet. Turn to the Lord in faith, and you will know what to do and how to do it."
-M. Russell Ballard, "Daughters of God," Ensign, May 2008, 110
I read that and I thought to myself that this is really true. I have noticed that when I take time to develop my own personality and work on hobbies and projects that I am interested in- even if it is only for 15 minutes a day, I am in general happier, more productive with monotonous tasks, and can take care of BJ and Gabe more unselfishly. So while I try to maintain a good balance between personal hobby type stuff and domestic duties, I have found that they complement each other nicely!
Tuesday, April 14, 2009
Placemat bag
So, I'm a little bit in love with bags of all sorts. I buy bags, and I make bags. I have bags full of bags. It's kind of an addiction. Probably not healthy. But they make me happy! Here is a bag I made a while back. Actually, I probably made at least 5 or 6 similarly designed bags, but was not smart enough to take pictures of them before I gave them away. I heard a couple years ago that you could make a cute purse out of a placemat, and I was intrigued. I'm sure there is a pattern on the web, but it didn't occur to me to look at the time I started making them, so I just kind of winged it, with some interesting results at first. Eventually I found something that worked and looked good to me. This bag went to one of my nieces for her birthday.


PS- I just googled "placemat purses" and came up with a bunch of pictures and tutorials. So there you have it. If you want to make one, do a search! (I could post my own instructions, but why reinvent the wheel?)


PS- I just googled "placemat purses" and came up with a bunch of pictures and tutorials. So there you have it. If you want to make one, do a search! (I could post my own instructions, but why reinvent the wheel?)
Tuesday, April 07, 2009
Baby Legs
A recent trend of the last few years have been "Baby Legs". They cover your baby's legs (obviously), keeping them warm and protecting their knees while crawling, and are especially handy if you like to keep your baby in onesies and not have to deal with snapping pants up every time you change their diaper. You can order them on the internet for about $12 a pair or... make your own! I bought a pack of 3 tube socks for $4.00ish from Target and so each pair cost me less than $1.50, and 10-20 minutes each (because I didn't want to follow the directions, and I ended up sewing things backwards like 3 times. Silly me.) You could probably do it for cheaper if you found a sale. Also, the socks I bought were no ordinary tube socks- they were womens above- the- knee socks (don't tell Gabe), so they will fit him for a long time.


Here is the tutorial I looked at: http://www.flickr.com/photos/babyhopes/sets/72157594274454468/


Here is the tutorial I looked at: http://www.flickr.com/photos/babyhopes/sets/72157594274454468/
Subscribe to:
Posts (Atom)

